DIY NAS Part 2: Storage
This is part 2 of the project, see here for the other parts.
I had 6x 1TB HDDs lying around not doing anything. That was partly what gave me the idea to do this project. The first problem is that the Mele Queiter doesn't have any SATA expansion.
One option was to replace the NVME drive with an NVME-to-SATA expander, but I didn't want to give up my only NVME slot. Instead, I found some USB-to-SATA adaptors PCBs.
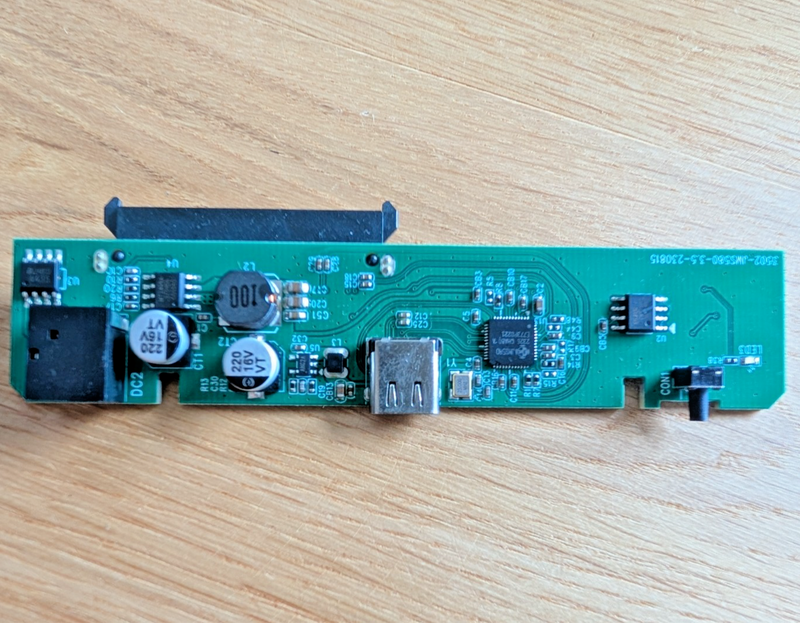
They use the JMS580 chipset.
One quirk with these adaptors is that because they're for external drives, they don't power on unless you press the little button. This was easily bypassed by permanently shorting the button contacts.
I have 4x USB 3.2 ports to play with. They're all wired to a single controller, which limits the total throughput to 10Gb/s, but that is plenty.
I had to use a USB hub because I needed 6 connections and I only have 4. I actually used two hubs to split the drives across two ports. It was much harder than I thought it would be to find a hub which actually had USB 3.0+ ports, not just claimed to.
Benchmarks
I wanted to run some benchmarks to check it was all working as expected. It wasn't. Speeds seemed to be capped at ~40MB/s 🙁
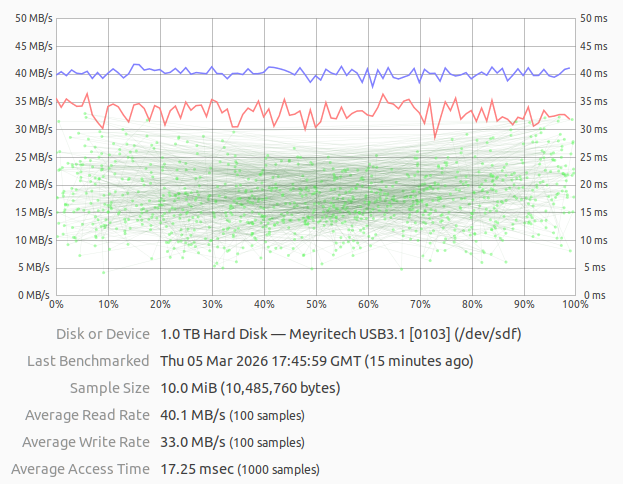
lsusb -t showed that the device was capped at USB 2.0 speeds:
/:  Bus 05.Port 1: Dev 1, Class=root_hub, Driver=xhci_hcd/2p, 480M
    |__ Port 1: Dev 10, If 0, Class=Mass Storage, Driver=uas, 480M
Then I realised the USB-C cable I was using wasn't a USB 3 cable 🤦. One cable swap later:
/:  Bus 06.Port 1: Dev 1, Class=root_hub, Driver=xhci_hcd/2p, 5000M
    |__ Port 1: Dev 5, If 0, Class=Mass Storage, Driver=uas, 5000M
That's more like it.
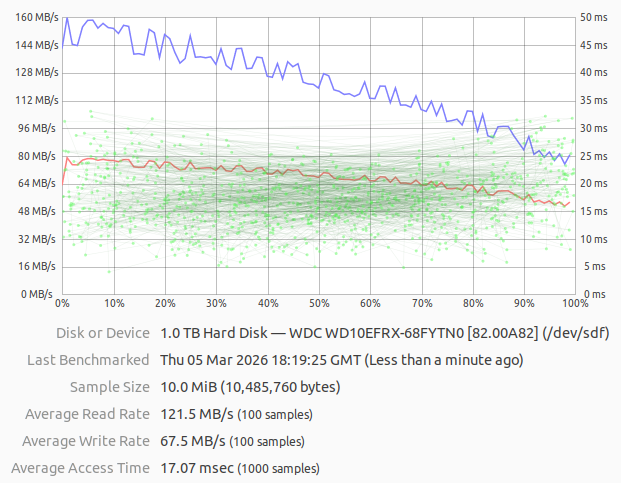
If you're wondering why the speed tapers off, it's normal for spinning HDDs.
Power
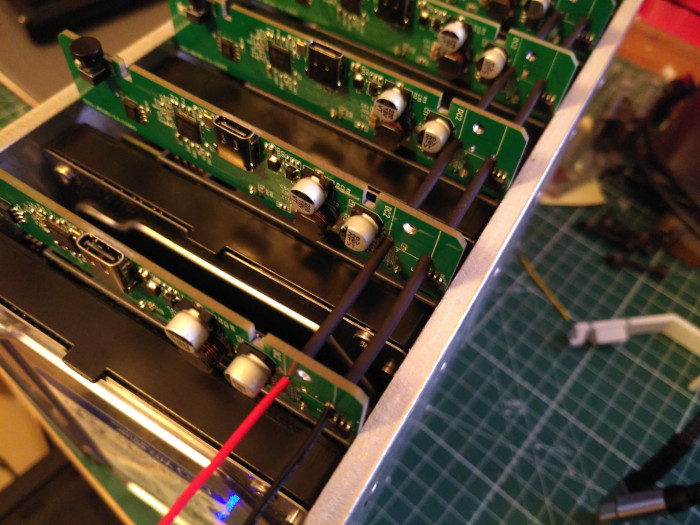
All the drives need a 12 V supply. The boards came with a 5.5 mm barrel connector for exactly this, but I wanted to connect them a little more neatly and permanently.
I de-soldered the barrel connectors and ran a pair of 22 AWG wires between each drive, adding heat shrink between each drive. I didn't have any red heat shrink small enough, but I think it turned out pretty well.
I span up all the drives to get power consumption measurement. It was 1.6 A (20 W) at idle and 2.3 A (27 W) with all disks fully active. To keep a 22 AWG wire below 60°C requires drawing less than 3 A. So I had room to spare.
When the drives first spin up, the power draw peaks at about 5 A (60 W). This is well above the safe rating, but it will be fine for a few seconds. I will need to factor this in when selecting a power supply to avoid brown-outs on boot.
Drivers
I started running the testing (below) and got errors and drives turning off. I also found the drives didn't have stable
paths, smartctl needed extra params. It all felt wrong. The internet suggested that the uas driver was to blame 1 2 3
and that switching to usb-storage would be more stable but slower.
I disabled the uas driver:
echo 'options usb-storage quirks=152d:0580:mu' | sudo tee /etc/modprobe.d/disable-uas.conf
sudo update-initramfs -u
sudo reboot
/:  Bus 02.Port 1: Dev 1, Class=root_hub, Driver=xhci_hcd/6p, 10000M
    |__ Port 1: Dev 2, If 0, Class=Hub, Driver=hub/4p, 5000M
        |__ Port 1: Dev 4, If 0, Class=Mass Storage, Driver=usb-storage, 5000M
        |__ Port 2: Dev 5, If 0, Class=Mass Storage, Driver=usb-storage, 5000M
        |__ Port 4: Dev 7, If 0, Class=Mass Storage, Driver=usb-storage, 5000M
    |__ Port 2: Dev 3, If 0, Class=Hub, Driver=hub/4p, 5000M
        |__ Port 1: Dev 6, If 0, Class=Mass Storage, Driver=usb-storage, 5000M
        |__ Port 2: Dev 8, If 0, Class=Mass Storage, Driver=usb-storage, 5000M
        |__ Port 4: Dev 9, If 0, Class=Mass Storage, Driver=usb-storage, 5000M
Stable Device Paths
I noticed that the drives weren't being assigned a stable /dev/sdX address, it seemed to depend on which drive came up
first. I put this down to them being connected via USB.
The solution to this was both easy and awesome. You can add udev rules which automatically create new entries in /dev
based on the serial number of the device. This meant that I could easily have stable device paths and I could use custom
names:
/etc/udev/rules.d/99-persistent-drive.rules
SUBSYSTEM=="block", KERNEL=="sd[a-z]", ENV{ID_SERIAL}=="WDC_WD10EFRX-68FYTN0_WD-WCC4J1RCSTT9", SYMLINK+="usb-aquila"
SUBSYSTEM=="block", KERNEL=="sd[a-z]", ENV{ID_SERIAL}=="WDC_WD10EFRX-68FYTN0_WD-WCC4J1RCSE6C", SYMLINK+="usb-carina"
SUBSYSTEM=="block", KERNEL=="sd[a-z]", ENV{ID_SERIAL}=="WDC_WD10EFRX-68FYTN0_WD-WCC4J6XUVCR5", SYMLINK+="usb-dorado"
SUBSYSTEM=="block", KERNEL=="sd[a-z]", ENV{ID_SERIAL}=="WDC_WD10EZEX-22MFCA0_WD-WCC6Y0EUEC9E", SYMLINK+="usb-fornax"
SUBSYSTEM=="block", KERNEL=="sd[a-z]", ENV{ID_SERIAL}=="WDC_WD10EFRX-68FYTN0_WD-WCC4J1RCS4VS", SYMLINK+="usb-hydrus"
SUBSYSTEM=="block", KERNEL=="sd[a-z]", ENV{ID_SERIAL}=="WDC_WD10EZEX-22MFCA0_WD-WCC6Y1SSHDK5", SYMLINK+="usb-tucana"
Now I can reference /dev/usb-aquila, /dev/usb-carina, etc.
Testing
These drives are not new. Two of them have over 50K power-on hours (almost all of that was idle). I wanted to test them to make sure they were still healthy.
I first ran the short and conveyance smartctl tests on every drive:
smartctl -t short -d sat /dev/usb-x
smartctl -t conveyance -d sat /dev/usb-x
This showed no issues. Next, I wanted to do a full read/write of all sectors to check for faults. I took a snapshot of the SMART data, then did a read/write across all sectors. I could then take another snapshot of the SMART data and compare it to the before to see if there are any new reallocated sectors.
Initially I ran badblocks but 7 hours into this test I found that it's not recommended any more.
Now it's recommended to write encrypted zeros to the whole drive and then read them back to see if anything got messed
up. This was muuuch faster, taking only 3hrs to complete.
cryptsetup open /dev/usb-x x --type plain --cipher aes-xts-plain64
shred -v -n 0 -z /dev/mapper/x
cmp -b /dev/zero /dev/mapper/x
This got the disks busy.

After it was done, I could diff the before and after of the SMART data:
diff --side-by-side --suppress-common-lines smart-before <(sudo smartctl -d sat -a /dev/usb-x)
This showed no errors 😁